|
|
|
|
Introduction to WPF 3D
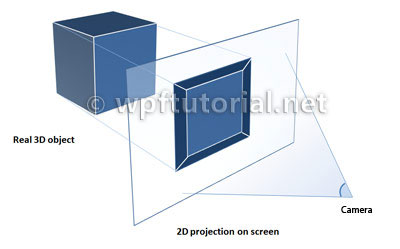
3D Graphic Basics
The basic idea of creating 3D graphics is to have a three dimensional model of an object. Because our screen is only two dimensional, we define a camera that takes a picture of the object. The picture is a projection of the object to a planar surface. This projection is rendered into an bitmap by the 3D rendering engine. The engine determines the color for every pixel by calculating the amount of light that is reflected by any light sources to the projection surface by the objects in the 3D space.
All surfaces of objects have a material and a brush. The material defines how much light is reflected for a specific angle and the brush defines the color. A brush can either be a simple color or a gradient or even an image called texture.
A world of triangles
In the world of 3D graphics, all objects are described by a set of triangles. But why triangles? The reason for this is that a triangle is the most granular geometry to describe a planar surface. The rendering engine can calculate the color of each triangle depending on its material and angle to the lights in the scene. If we would build our world on rectangles, the points don't need to be plane. The surface will be a lot more complex to calculate and render.
A surface of a 3D object is called a mesh. A mesh is defined by a number of 3D points. These points are called vertices. The vertices are joined together by a winding pattern to define the triangles. Every triangle has a front and a back side. Only the front side is rendered. The front side is defined by the winding order of the points. WPF uses a counter clockwise winding pattern. You can remember this with a simple mnemonic called the "right hand rule". This means if you close your right hand to a thumb-up gesture, your finger make a counter clockwise move while the thumb shows up. The fingers show the winding order, while the thumb indicates the upper-side of the triangle.


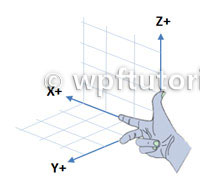
A right handed coordinate system
WPF uses a right-handed coordinate system. This means that if you hold the fingers of your right hand as shown on the picture, the fingers indicate the positive direction of the tree axes.
Elements of a 3D scene
- Viewport3D
The viewport is the control that builds the gate between the 2D and the 3D world.
- Camera
Every 3D scene has excactly one camera. The camera defines the Position and the LookDirection and the UpDirection of the viewer. WPF supports orthographical and perspective cameras.
- 3D Models
A 3D model defines an object in the scene. It has a Geometry that is the mesh and a Material that can be a diffuse, specular or emmisive material. The material itself has a brush.
- Lights
Without any lights you see nothing. So we need to place at least one light in our scene to illuminate our models. WPF supports different kind of lights, like:
AmbientLightDirectionalLightPointLightSpotLight
Hello 3D-World - A Simple Cube
The following example shows how to create a basic cube mesh with 8 vertices that are wired up in 12 triangles that form the shape of the cube.

<Viewport3D>
   <Viewport3D.Camera>
      <PerspectiveCamera Position="-40,40,40" LookDirection="40,-40,-40 "
                         UpDirection="0,0,1" />
   </Viewport3D.Camera>
   <ModelVisual3D>
      <ModelVisual3D.Content>
         <Model3DGroup>
            <DirectionalLight Color="White" Direction="-1,-1,-3" />
               <GeometryModel3D>
                  <GeometryModel3D.Geometry>
                     <MeshGeometry3D Positions="0,0,0 10,0,0 10,10,0 0,10,0 0,0,10
                        10,0,10 10,10,10 0,10,10"
                        TriangleIndices="0 1 3 1 2 3  0 4 3 4 7 3  4 6 7 4 5 6
                                         0 4 1 1 4 5  1 2 6 6 5 1  2 3 7 7 6 2"/>
                  </GeometryModel3D.Geometry>
                  <GeometryModel3D.Material>
                     <DiffuseMaterial Brush="Red"/>
                  </GeometryModel3D.Material>
               </GeometryModel3D>
            </Model3DGroup>
         </ModelVisual3D.Content>
      </ModelVisual3D>
</Viewport3D>
Last modified: 2009-07-04 16:21:17
Copyright (c) by Christian Moser, 2011.
 Comments on this article Comments on this article
Show all comments
 |
| ANURAG | |
|
| Commented on 26.February 2009 |
| Please complete to be continued article... this seems to be very informative ..
|
|
|
|
| Lentucky | |
|
| Commented on 2.March 2009 |
Very interesting!
Have connections with DirectX concepts?
|
|
|
|
| Rafael | |
|
| Commented on 12.March 2009 |
| Excellent definition, I can't wait to read more information and I would really apreciate to have a decent example for studding.
|
|
|
|
| B.S.P.Srinivas | |
|
| Commented on 23.April 2009 |
| Please complete the article i think this is not much informative
|
|
|
|
| what | |
|
| Commented on 6.May 2009 |
| good
|
|
|
|
| Maj3d | |
|
| Commented on 18.May 2009 |
| We are really waiting for the completion, I think I'm understanding this better than other tutorials!
|
|
|
|
| HSN | |
|
| Commented on 20.May 2009 |
very good article as beginning to the graphics of wpf ,
can you suggest a good book for wpf graphics for me , please ?
|
|
|
|
| jenny | |
|
| Commented on 26.May 2009 |
Can you give an simple example about it,thank you.
I want to draw 3D Graphics in the scene,but I don't konw how to draw it,for example drawing an apple.
|
|
|
|
| jenny | |
|
| Commented on 26.May 2009 |
| About to draw the 3D Graphics in the scene,do you konw Petzold.Media3D,can you draw graphics with it,because I can not find a right method to slove my problem,can you help me,thank you.
|
|
|
|
| Vb expert | |
|
| Commented on 1.June 2009 |
| This is the same kind of "informational article" I have seen on graphics programming with DirectX since I was doing vb6 and DirectX 8. The author gives us bland definitions that we can get from any of the 500 DirectX books out there then they "leave the scene". The simple fact is that creating a DirectX 3D app is still complicated and the author, like the rest of us, is still trying to figure it out. I'd check back for an updated example in 6mos. Even that example will probably be another generic example that can be obtained from reading any generic DirectX book. Lets get specific people!
|
|
|
|
| .NET... | |
|
| Commented on 2.June 2009 |
| Can i have some example so that i can design 3D looks when i draw some human being
|
|
|
|
| Prashant | |
|
| Commented on 5.June 2009 |
| waiting for the continued article ..
|
|
|
|
| Dr TJ | |
|
| Commented on 4.July 2009 |
hi
damet garm refigh... kheyli hal dadi...
excuse
it means: thanks a lot... very good... keep it up...
|
|
|
|
| Thiru | |
|
| Commented on 20.July 2009 |
| It is nice article for starting 3D in WPF.. Thanks
|
|
|
|
| hemanth | |
|
| Commented on 23.July 2009 |
| if it is better if you complete it... thanks
|
|
|
|
| Dude | |
|
| Commented on 23.July 2009 |
| Hey why not complete it? Please... Come on... JESUS FUCKING CHRIST whats up with these people!
|
|
|
|
| SSJ | |
|
| Commented on 8.September 2009 |
| Nice article. Helped me lot in breaking ice with WPF 3D. Thanks.
|
|
|
|
| Mohideen AK | |
|
| Commented on 10.September 2009 |
| Simple and best. It could be useful for 3D beginners.
|
|
|
|
| Kalpesh Vekaria | |
|
| Commented on 18.September 2009 |
It is pleasure article for starting 3D in WPF..
excellent........
Thanks
|
|
|
|
| Ranci | |
|
| Commented on 30.September 2009 |
@Vb Expert (visual Basic?)
Just in case: I like this site very much, because I got very straight and small examples. If I want to know more, I can read the *uckin* 500 manuals or maybe Foley / Van Dam ...
However, a simple approach how to recognize the main features of WPF is more adequate. Do you agree?
|
|
|
|
| Andreé | |
|
| Commented on 6.October 2009 |
| Podrian ofrecer el website en español??? Gracias...
|
|
|
|
| Willliam | |
|
| Commented on 26.November 2009 |
| Andreé, traduce el site no seas webon
|
|
|
|
| Mercury | |
|
| Commented on 14.December 2009 |
| Very Nice and easy to understand!
|
|
|
|
| austin | |
|
| Commented on 21.December 2009 |
sorry , i think the " right-handed coordinate system" picture is wrong.
Increasing values of X are to the right; increasing values of Y are upward; increasing values of Z come out of the computer screen and toward the viewer. This is known as a right-hand coordinate system: If you point the forefinger of your right hand in the direction of increasing X values and the middle finger points to increasing Y values, your thumb points to increasing Z values.
|
|
|
|
| vishnu | |
|
| Commented on 6.January 2010 |
| Good one
|
|
|
|
| Steam | |
|
| Commented on 18.January 2010 |
| I think austin is right. In both coordinate systems (left-hand and right-hand) positive X is right, positive Y is upward. The diference is Z axis. See http://msdn.microsoft.com/en-us/library/ee415205%28VS.85%29.aspx for details.
|
|
|
|
| Sandeep... | |
|
| Commented on 22.January 2010 |
Very good tutorial!
Sandeep
http://sandeep-aparajit.blogspot.com
|
|
|
|
| Deepak | |
|
| Commented on 3.February 2010 |
| Thanks For the Tutorial..
|
|
|
|
| Kevin | |
|
| Commented on 9.February 2010 |
| Uh, this is pretty useless. I think that you just copied the article here: http://www.kindohm.com/technical/wpf3dtutorial.htm which explains exactly what you did in better detail and goes a little more in depth... noone wins when you plagiarize.
|
|
|
|
| Qyuan | |
|
| Commented on 10.March 2010 |
| Good tut, nice work! Thanks alot.
|
|
|
|
| Arturiux | |
|
| Commented on 22.March 2010 |
| Yo soy aprendiz en WPF pero tengo un truco para crear un modelo tridimensional que sea algo complicado y con muy buena presentación, Primero crea el modelo en SolidWorks, Guardalo como .XAML, Después utilice Expression Blender y ahi lo agregue como recurso .XAML en la opción agregar elemento existente. El archivo generado ya cuenta con viewport, Camara, Lights y los 3dmodels para cada parte del ensamble de solid.
|
|
|
|
| csmac | |
|
| Commented on 7.April 2010 |
| Very nice tutorial of the basics of 3D in wpf. Very helpful. Keep up the good work.
|
|
|
|
| mohamed... | |
|
| Commented on 1.May 2010 |
| a very good tutorial, i need more aboute 3D tutorials
|
|
|
|
| Norris | |
|
| Commented on 7.May 2010 |
Thanks for this tutorial ! I learn WPF since ... 2 hours and I have understand all lol.I use much the 3D as a computer graphics "expert" (MAXON C4D) and I don't understand Why Microsoft have choosed to use the Right Hand Coordinate system.is this only to induce us in error?
|
|
|
|
| Raja | |
|
| Commented on 7.May 2010 |
| Good article for WPF 3D begineers
|
|
|
|
| Ammar marzouk | |
|
| Commented on 13.May 2010 |
| how i can build a good applicatio with wpf?
|
|
|
|
| Nobody | |
|
| Commented on 14.June 2010 |
| Dude, such a fake site. You're just copy & pasting the first page of any WPF for dummies tutorial and selling it as your own. Shame on you. Bet you got even hired due to this site by some brain-dead company which thought you're a WPF expert... lol.. the world is full of strange people indeed.
|
|
|
|
| Parimal Pimple | |
|
| Commented on 14.June 2010 |
| Great site. Helped me a lot learning WPF Basics.
|
|
|
|
| khagesh | |
|
| Commented on 17.June 2010 |
| vry good..
|
|
|
|
| Tyson | |
|
| Commented on 17.June 2010 |
| vry good.. U Rock Dude..Who!!
|
|
|
|
| ar | |
|
| Commented on 18.June 2010 |
| good job
|
|
|
|
| subhkriti | |
|
| Commented on 21.June 2010 |
| fabulous article, such a nice concept seems directly delivered from physics..but my expectation is more than this.
|
|
|
|
| arjun | |
|
| Commented on 25.June 2010 |
| fabulous article, such a nice concept seems directly delivered from physics..but my expectation is more than this.but I don't know how to use
|
|
|
|
| Adam | |
|
| Commented on 4.July 2010 |
I have the following XAML code.
P0 (0, -3.0), P1 (5, -3.0), P2 (5, -3.5), P3 (0, -3.5).
"<Viewport3D Height="750" Width="800">
<Viewport3D.Camera>
<PerspectiveCamera Position="10,-1,10" LookDirection="-10,1,-10" UpDirection="0,1,0" />
</Viewport3D.Camera>
<ModelVisual3D>
<ModelVisual3D.Content>
<Model3DGroup>
<AmbientLight Color="Bisque"/>
<DirectionalLight Color="Red" Direction="-3,-5,-2"/>
<GeometryModel3D>
<GeometryModel3D.Geometry>
<MeshGeometry3D Positions="0,-3,0 5,-3,0 5,-3,5 0,-3,5" TriangleIndices="0 2 1 0 3 2 "/>
</GeometryModel3D.Geometry>
<GeometryModel3D.Material>
<DiffuseMaterial Brush="Brown"/>
</GeometryModel3D.Material>
</GeometryModel3D>
</Model3DGroup>
</ModelVisual3D.Content>
</ModelVisual3D>
</Viewport3D>"
I want to draw the line p0-> P1, P1-> P2, P2-> 3 ... . We have different colors. I draw the square by p0, p1, p2, p3 with two three price p0, P1, P2 and P1, P2, P3. I would like this triangle we have two different colors. So please just help me XAML code.
|
|
|
|
| humanblade | |
|
| Commented on 11.July 2010 |
| i've been following examples on this site, most have been good. this one slit my wife's throat and proceeded to violate the gash with it's digital member. where do i submit bug?
|
|
|
|
| Techie_Devel... | |
|
| Commented on 20.July 2010 |
| Very Nice article!!
|
|
|
|
| Giles | |
|
| Commented on 6.August 2010 |
| It doesn't matter which way you hold your hand, and whether any axis ends up being up/down/in/out or what ever. The right hand concept is that going from pointer finger to middle figer to thumb represent x,y and z, and the image in this article conforms to this. The differnce lies in that in the the right hand system positive rotations occur anti-clockwise about an axis, for example, to rotate the X axis towards the Y, you would rotate about Z in a anti-clockwise direction with respect to the Z axis. In the left hand system a clockwise rotation about the Z axis would be required to rotate the X axis towards the Y.
|
|
|
|
| sathyabala | |
|
| Commented on 6.September 2010 |
great one. i like wpf now very well....
need lots of examples help me sir.. ok.
am from india.
|
|
|
|
| Dave | |
|
| Commented on 10.September 2010 |
| To all those saying this is plagarism, prove it please and stop critisizing people who try to help. Why dont YOU create a site if you could do it better! GET A LIFE! Nice site dude, helped me a lot.
|
|
|
|
| Guille | |
|
| Commented on 25.September 2010 |
| Great publication! It is very useful for begginers. Thanks!
|
|
|
|
| Guille | |
|
| Commented on 25.September 2010 |
| Great publication! It is very useful for begginers. Thanks!
|
|
|
|
| Neil | |
|
| Commented on 4.October 2010 |
@Dave - In the third comment in this article he links directly to the article he claims this is plagiarised from.
I disagree that it's plagiarised, I think this article better explains the absolute basics of what WPF 3D is, but that the kindohm tutorial is much better at explaining how to use WPF 3D.
|
|
|
|
| Debug | |
|
| Commented on 20.October 2010 |
You have a special web-Site....And thank about the perfect information.
how now how to paint Star or polygon in the code (in WPF) and I have only
the width and height of the star or polygon.
It very important me and I need it S-O-S.
Thank
Debug.....
|
|
|
|
| Shekhar | |
|
| Commented on 21.October 2010 |
| This is good i think this help to all developer who want to work on WPF
|
|
|
|
| Achilles | |
|
| Commented on 23.November 2010 |
| Great work !!
|
|
|
|
| tsingroo | |
|
| Commented on 1.December 2010 |
| need more, plz continue
|
|
|
|
| Jawahar | |
|
| Commented on 28.December 2010 |
| This is good. But I like to know how to design 3D objects using Expression Blend.
|
|
|
|
| Saurabh | |
|
| Commented on 28.December 2010 |
| Hey, good tutorial....well i developed a browser with this 3D cube concept but currently only single phase of the browser is active to show the single URL and all other phases shows its screen shot....pls. tell me how to enable or load different URL's on each phase...is it ur area of working or not...
|
|
|
|
| rer | |
|
| Commented on 12.January 2011 |
| 232
|
|
|
|
| simran | |
|
| Commented on 11.February 2011 |
| Very good article
|
|
|
|
| Mega | |
|
| Commented on 15.February 2011 |
| Ok so how about events, multiple geometries in the same viewport, storyboards and different lighting types? a lil disappointed with this extremely limited example of what wpf 3d can do. guess this is not the place to find out how to trigger an event when a mouse is clicked on a face of a mesh or another mesh within the viewport
|
|
|
|
| Rafael | |
|
| Commented on 2.March 2011 |
Caro,
podes me ajudar?
tenho uma serie de pontos e preciso plotar uma superfÃcie e rotaciona-la e aplicar zoom.
No aguardo.
|
|
|
|
| Rafael | |
|
| Commented on 2.March 2011 |
Friend,
can you help me?
I have a series of plot points and need a surface and rotate it and zoom.
Waiting in the wings.
|
|
|
|
| Rahul | |
|
| Commented on 2.March 2011 |
| Very Very Good And Esay To DO.
|
|
|
|
| Rajendra | |
|
| Commented on 8.March 2011 |
| I'll try this and after i will lets you know.
|
|
|
|
| Chetan | |
|
| Commented on 9.March 2011 |
| i want to write the PROPEQUITY in 3d and import XAML, can you tell me wht is the xaml code. pls ....
|
|
|
|
| free adult... | |
|
| Commented on 20.March 2011 |
xxgk wwprs <a href="http://www.gabbysporn.com">free adult videos</a> zgehnu g pe q cnr
scbu ysyey [URL=http://www.gabbysporn.com - porno[/URL - eoetve e ts y fgd
|
|
|
|
| Johnson | |
|
| Commented on 27.June 2011 |
| Supa nice
|
|
|
|
| kondsreddy | |
|
| Commented on 7.July 2011 |
<Viewport3D>
<Viewport3D.Camera>
<PerspectiveCamera Position="-40,40,40" LookDirection="40,-40,-40 "
UpDirection="0,0,1" />
</Viewport3D.Camera>
<ModelVisual3D>
<ModelVisual3D.Content>
<Model3DGroup>
<DirectionalLight Color="White" Direction="-1,-1,-3" />
<GeometryModel3D>
<GeometryModel3D.Geometry>
<MeshGeometry3D Positions="0,0,0 10,0,0 10,10,0 0,10,0 0,0,10
10,0,10 10,10,10 0,10,10"
TriangleIndices="0 1 3 1 2 3 0 4 3 4 7 3 4 6 7 4 5 6
0 4 1 1 4 5 1 2 6 6 5 1 2 3 7 7 6 2"/>
</GeometryModel3D.Geometry>
<GeometryModel3D.Material>
<DiffuseMaterial Brush="Red"/>
</GeometryModel3D.Material>
</GeometryModel3D>
</Model3DGroup>
</ModelVisual3D.Content>
</ModelVisual3D>
</Viewport3D>
|
|
|
|
| at | |
|
| Commented on 9.August 2011 |
| hmm
|
|
|
|
| Onur | |
|
| Commented on 9.August 2011 |
| very nice it's impressive
|
|
|
|
| Md. Nasim Uddin | |
|
| Commented on 14.August 2011 |
| nice document
|
|
|
|
| jenny | |
|
| Commented on 28.August 2011 |
hello, I am new to 3D and WPF together,
i tried to create simple 2 buttons in Viewport3D, like this:
--------------------------------------------------------------
<Viewport3D Width="300" Height="300" >
<Viewport3D.Children>
<Viewport2DVisual3D>
<Viewport2DVisual3D.Geometry>
<MeshGeometry3D
Positions="-1,-1,0 1,-1,0 1,1,0 -1,1,0"
TextureCoordinates="0,1 1,1 1,0 0,0"
TriangleIndices="0,1,2 2,3,0"
/>
</Viewport2DVisual3D.Geometry>
<Viewport2DVisual3D.Material>
<DiffuseMaterial Viewport2DVisual3D.IsVisualHostMaterial="True" Brush="Red"/>
</Viewport2DVisual3D.Material>
<Canvas Height="300" Width="300">
<Button Canvas.Left="0" Canvas.Top="0" Height="60" Width="60" Content="one" />
<Button Canvas.Left="65" Canvas.Top="60" Height="100" Width="40" Content="two" />
</Canvas>
</Viewport2DVisual3D>
<ModelVisual3D>
<ModelVisual3D.Content>
<SpotLight Color="White" Position="0,0,3" Direction="0,0,-1" Range="50"
OuterConeAngle="59" InnerConeAngle="0" />
</ModelVisual3D.Content>
</ModelVisual3D>
</Viewport3D.Children>
<!-- Camera. -->
<Viewport3D.Camera>
<PerspectiveCamera FarPlaneDistance="20"
LookDirection="0,0,-1"
UpDirection="0,1,1"
NearPlaneDistance="1"
Position="0,0,5"
FieldOfView="45"
/>
</Viewport3D.Camera>
</Viewport3D>
----------------------------------------------------------------------
i can't understand why when i change the properties of one button its affecting how i see the other button, for example when i change button's "two" height from 60 to 100 , button "one" becomes smaller???
please help me understand,
tnx jenny
|
|
|
|
| BindraBindu | |
|
| Commented on 16.September 2011 |
Hi Everyone,
Really! this is very nice article.
Here I have also another example, how to create 3D shape in WPF. Please check out the following links for more details .............
http://www.mindstick.com/Articles/fdec9740-4e4c-49c2-8395-6e610950f3c4/?Create%203-D%20cube%20in%20WPF
Thanks !!!!!!!
|
|
|
|
|

|
 Share...
 Feed
About Christian Moser
Feed
About Christian Moser